Archive

Archive for the ‘SharePoint’ Category

SharePoint 2013 Modal Dialog Tips & Tricks

March 22nd, 2013 Comments

After hibernating for the winter, I have a spring treat for you all.

I present to you: Tips & Tricks: SharePoint 2013 Modal Dialogs. It’s a follow-up to my original SharePoint 2010 dialog tips & tricks post!

SharePoint 2010 Modal Dialog Tips & Tricks

October 30th, 2012 Comments

Wow, another week to-the-day and it’ll have been two years since I posted anything here!

Have learnt much and doing very cool things at Collabware and our CLM product for the past year and I’ve finally gotten off my butt and wrote a post with some tips & tricks on SharePoint 2010 Modal Dialogs on our blog:
http://blog.collabware.com/2012/10/30/tips-tricks-sharepoint-2010-modal-dialogs/

Of note is the ability to resize a modal dialog. I hadn’t found a completely working example so I’ve posted a version of the code we use for Collabware CLM. It leverages the same code that’s in SP.UI.Dialog.js when it initially sizes the dialog on page load. No dependencies on jQuery or other external frameworks!

SharePoint 2010: var $ conflict between CMSSiteManager.js and jQuery

November 6th, 2010 1 comment

I ran into an issue recently on a SharePoint 2010 project where a page containing a Thumbnails list view was throwing a JavaScript error. I actually took the wrong path troubleshooting this and burned through a lot of time as a result. I had incorrectly assumed the error had something to do with our custom master page.

Turns out the CMSSiteManager.js library that is used by the Thumbnails list view is also using the $ variable! Argh!

Good thing the plug-in pattern we use only calls $ internally and not globally…

(function($) {
  // plug-in goodness here...
})(jQuery);

Unfortunately our scripts for invoking the plug-ins was referencing $:-(

$(document).ready(function(){
  $('.foo').samplePlugin();
});

A quick replacement of $ to jQuery did the trick:

jQuery(document).ready(function(){
  jQuery('.foo').samplePlugin();
});

If you have large blocks of inline jQuery code on your page, you’ll probably want to use jQuery.noConflict():

jQuery.noConflict()(function() { 
    // code using $ as alias to jQuery
});

Issue with custom styles in the SharePoint 2010 Rich Text Editor and @media

October 12th, 2010 Comments

I recenty ran into some issues with exposing custom styles in the SharePoint 2010 Rich Text Editor (RTE) in browsers other than IE, or specifically with Firefox and Safari.

In order to have a custom style show up in either the Markup Styles and Styles drop downs in the Ribbon, you need to prefix your HTML class with either ms-rteElement- (shows up in Markup Styles) or ms-rteStyle- (shows up in Styles). You also need to use the -ms-name property within your rule.

For example:

H2.ms-rteElement-H2Lg {
  -ms-name: "Large Heading 2";
  font-size: 26px;
}

The problem I ran into was that the custom styles showed up the dropdowns for IE but not in any other browser. At first I though it was because the -ms-name property is a custom CSS extension in the MS name space. I tried adding properties like -moz-name and -webkit-name and even name but they had no effect.

Turns out the RTE custom styles don’t show up if they appear inside an @media block in your CSS file!

I ended up creating a bunch of stubs with just name -ms-name property BEFORE the @media block. If you try to place the stubs after the @media block, the RTE does not pick-up the label for the custom styles, they show up as empty options without labels in the RTE drop downs.

/* create stubs with -ms-name property here */
h2.ms-rteElement-H2Lg {
  -ms-name: "Large Heading 2";
}

ul.ms-rteStyle-LinksList {
  -ms-name:"Links List";
}

/* place actual properties inside @media block */
@media screen {

  h2.ms-rteElement-H2Lg {
    font-size: 26px;
  }

  ul.ms-rteStyle-LinksList {
    list-style: none;
    margin: 0;
    padding: 0;
  }

}

You can read more about how to create custom styles for the SharePoint 2010 RTE here:

SharePoint 2010: Fixing the MSDN Contextual Tab Web Part Walkthrough

July 31st, 2010 4 comments

UPDATE!!!

The latest versions of the CKSDev for SharePoint 2010 include an SPI for stubbing out a contextual web part! I highly recommend that anyone coding for SP2010 to install the CKS Dev Tools!

http://cksdev.codeplex.com/

I haven’t had much opportunity to work with SharePoint 2010 in the past few months. However, I did get to try out the MSDN walkthrough for creating a custom web part with contextual ribbon tab recently. You can find the article here: http://msdn.microsoft.com/en-us/library/ff407578.aspx

In a nutshell, what’s supposed to happen is when you click on the web part, there will be a custom tab that appears in the Ribbon. It all works great for the first instance of the custom web part you place onto a page, but if you try adding a second instance of the web part, your page blows up!

You’ll get the following error:
Item has already been added. Key in dictionary: ‘Ribbon.CustomContextualTabGroup’ Key being added: ‘Ribbon.CustomContextualTabGroup’

:-/ … looks like there wasn’t much QA done for the walkthrough. Anyways, to make a short story shorter… I posted a question on the TechNet forums and Dallas Tester from MS did get back to me with a bunch of suggestions.

Here are the changes you can make to allow for multiple instances of the custom web part to appear on the page without everything blowing up.

Make the following modifications to the ContextualTabWebPart class.

Add the global ‘_added’ bool and OnInit event handler:

static bool _added = false;

protected override void OnInit(EventArgs e)
{
 base.OnInit(e);
 _added = false;
}

Since we no longer have to get the unique component ID in the delay script, I changed DelayScript into a private string:

private string delayScript = @"
 function _addCustomPageComponent()
 {
  for (var i = 0; i < g_customWebPartIds.length; i++)
  {
    SP.Ribbon.PageManager.get_instance().addPageComponent(new ContextualTabWebPart.CustomPageComponent(g_customWebPartIds[i]));
  }
 }

 function _registerCustomPageComponent()
 {
  SP.SOD.registerSod(""CustomContextualTabPageComponent.js"", ""/_layouts/CustomContextualTabPageComponent.js"");
  var isDefined = ""undefined"";
  try
  {
   isDefined = typeof(ContextualTabWebPart.CustomPageComponent);
  }
  catch(e)
  {
  }
  EnsureScript(""CustomContextualTabPageComponent.js"",isDefined, _addCustomPageComponent);
 }
 SP.SOD.executeOrDelayUntilScriptLoaded(_registerCustomPageComponent, ""sp.ribbon.js"");";

Modify the OnPreRender event handler:

protected override void OnPreRender(EventArgs e)
{
 base.OnPreRender(e);

 ClientScriptManager csm = this.Page.ClientScript;
 string componentId = SPRibbon.GetWebPartPageComponentId(this); // the unique component id 

 // if this is the first instance of the custom web part,
 //we need to add the contextual tab to the ribbon
 if (!_added)
 {
  this.AddContextualTab();
  _added = true;
 }

 // we need to create an array which will store the IDs of all instances of our custom web part
 csm.RegisterClientScriptBlock(
  this.GetType(), "DeclareCustomWebPartArray", "var g_customWebPartIds = new Array();", true);

 // add this webpart's ID to our array
 csm.RegisterClientScriptBlock(
  this.GetType(), "AddCustomWebPartId" + componentId, "g_customWebPartIds.push('" + componentId + "');", true);
   
 csm.RegisterClientScriptBlock(this.GetType(), "ContextualTabWebPart", this.delayScript, true);
}

If you want to verify that the correct web part is trigger the Ribbon commands, you can modify the ‘handleCommand‘ method in ‘CustomContextualTabPageComponent.js

handleCommand: function ContextualTabWebPart_CustomPageComponent$handleCommand(commandId, properties, sequence) {
 if (commandId === 'CustomContextualTab.HelloWorldCommand') {
  alert(this._webPartPageComponentId + ' says: Hello, world!');
 }
 if (commandId === 'CustomContextualTab.GoodbyeWorldCommand') {
  alert(this._webPartPageComponentId + ' says: Good-bye, world!');
 }
}

Here’s a ZIP file of the entire solution in case you’re too lazy to make the modifications yourself. :-)

SharePoint 2010: CssRegistration ConditionalExpression Property

March 1st, 2010 Comments

In a previous post detailing the new SharePoint 2010 CssRegistration control, I mentioned that I did not know what the ConditionalExpression property did. Well, now I do!

This property takes an Internet Explorer Conditional Comment. For example, if we wanted to link to a style sheet specific to IE 7 or greater, we can do this:

<SharePoint:CSSRegistration Name="foo.css" ConditionalExpression="gte IE 7" runat="server" />

The following markup would be emitted:

<!--[if gte IE 7]>
<link rel="stylesheet" type="text/css" href="foo.css"/>
<![endif]-->

Branding SharePoint 2010 Collaboration Sites – Part 3 in a Series

February 23rd, 2010 4 comments

In part two, we posted about how to register our custom style sheets in a way that we could still take advantage of the new SharePoint 2010 colour switching theming engine. In this post we’ll go through how to do this without having to modify the out-of-the-box master pages or having to use custom master pages for your sites.

Delegate Controls

As I mentioned at the end of part two, the way we’re going to get our CSS added to our sites and pages is through the use of a delegate control. For those of you who aren’t familiar with delegate controls, they are essentially placeholders for you to inject your own controls via a feature. Your feature can be scoped to either Web, Site, WebApplication or Farm. I’m going to keep the explanation on delegate controls short as there’s plenty of information out there about them:

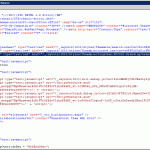
Screenshot of AdditionalPageHead delegate control in v4.master

AdditionalPageHead Delegate Control

The AdditionalPageHead Delegate

Delegate controls have a AllowMultipleControls property which when set to true, all controls keyed to that delegate are added to the page; when set to false, only the control registered with the lowest sequence value is added to the page.

All of the delegate controls in the OOTB master pages have AllowMultipleControls set to false, with the exception of one, AdditionalPageHead, which does allow multiple controls. And guess what? AdditionalPageHead is actually located in the page head, where you would normally add CSS elements! This is the perfect place for us to inject any CSS registration controls.

Putting it all together…

Let’s put together a simple solution using the Visual Studio 2010 SharePoint Tools which will:

  1. deploy our CSS file in the Themable folder in the /Layouts/1033/Styles
  2. deploy a user control into the ControlTemplates folder which uses the CSSRegistration control to register our CSS
  3. install a feature which inserts our user control onto our pages via the AdditionalPageHead delegate

The CSS

Keeping it simple, all our CSS does is set the background color of the <body>. We’ll use #FFF (white) as our default background color and also decorate the rule with one of the SharePoint 2010 compile time directives to whatever we might set the “Light1” color value as through the Theme UI.

body {
/*[ReplaceColor(themeColor:"Light1")]*/
background-color: #fff;
}

The Delegate Control

Again, nice and simple, we’re going to use the CSSRegistration control to register our branding CSS after corev4.css:

<%@ Assembly Name="$SharePoint.Project.AssemblyFullName$" %>
<%@ Register Tagprefix="SharePoint" Namespace="Microsoft.SharePoint.WebControls" Assembly="Microsoft.SharePoint, Version=14.0.0.0, Culture=neutral, PublicKeyToken=71e9bce111e9429c" %>

<sharepoint :CSSRegistration Name="<% $SPUrl:~sitecollection/_layouts/1033/Styles/Themable/SingChan.SP2010.Branding/branding.css %>" After="corev4.css" runat="server" />
</sharepoint>

Element Manifest

And finally we’ll define our element manifest for our delegate feature:

<?xml version="1.0" encoding="utf-8"?>
<elements xmlns="http://schemas.microsoft.com/sharepoint/">
    <control Id="AdditionalPageHead" Sequence="80" ControlSrc="~/_ControlTemplates/SingChan.SP2010.Branding/CSSRegistrationControl.ascx" />
</elements>

You’ll most likely scope your delegate feature to either Web or Site for branding purposes. I tend to scope my feature at the site collection level to achieve a consistent brand across all the webs in the site collection. If there’s a requirement to have different branding for one or two specific sites, then we can always have a second feature which deploys those overrides at a web-level scope. If you have vastly different brands across webs in your site collection, then you may want to scope only at the web level so that your brands don’t conflict or end up with any style inheritance issues.

That’s it!

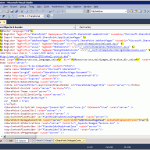
If all went well, we should see the link to our style sheet emitted after the link to corev4.css!

Screen shot of HTML source of page containing a link to the branding CSS.

Our branding CSS being emitted in HTML

If all is not well, here’s the ZIP file containing the branding VS2010 solution for reference:
SingChan.SP2010.Branding.zip

Previously…

SharePoint 2010: Show Dialog on Page Load

February 11th, 2010 Comments

A quick tip…

Because the sp.ui.dialog.js library is lazy-loaded, it may not be available when the page is ready/loaded. I’ve seen some early examples where if you wanted to do something on page load, you use:

_spBodyOnLoadFunctionNames.push("YourInitFunction()");

This will not work if you want to open a SharePoint dialog on page load. Instead use:

ExecuteOrDelayUntilScriptLoaded(YourInitFunction, "sp.ui.dialog.js");

SharePoint 2010: Upgrading your Public Beta solutions to RC

February 11th, 2010 Comments

A word to the wise, if you’re planning on upgrading your solutions developed on the public beta to the new SharePoint 2010 Release Candidate, double check your code!

This is especially true if you have custom master pages, page layouts, or site templates which are derived from the OOTB ones.

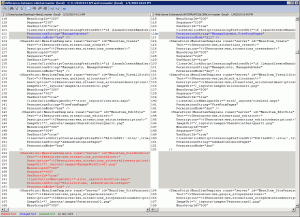
Here’s a simple screen grab of a diff between the Public Beta v4.master and the version in the RC:

Screenshot of differences between the public beta and RC v4.master pages.

v4.master differences

Notice one of the Site Actions menu items has been removed in the RC and permissions are slightly different in another. There are other small differences in the v4.master like some of the sprite co-ordinates have changed for the help and recycle bin icons which might leave you scratching your head as to why the wrong image is showing up.

The v4.master is just a short example. I found quite a few differences in the Blog site template and spent quite a bit of time doing diffs and merging my customizations back into the updated RC versions.

If you’re using TFS for your source control, I found it helpful to just copy and paste the contents of original version of whatever file you customized into your versioned control file and then doing a difference/merge between that and the last version checked-in.

Categories: Development, SharePoint

Yaroslav on Customizing the SharePoint 2010 Ribbon

December 29th, 2009 Comments

My buddy Yaroslav’s been blogging away about customizing the SharePoint 2010 ribbon, like the mad scientist that he is, over the past few weeks…

Here’s what he’s got so far:

Go check it out!

Categories: Development, SharePoint