Archive

Posts Tagged ‘ue’

SharePoint 2013 Modal Dialog Tips & Tricks

March 22nd, 2013 Comments

After hibernating for the winter, I have a spring treat for you all.

I present to you: Tips & Tricks: SharePoint 2013 Modal Dialogs. It’s a follow-up to my original SharePoint 2010 dialog tips & tricks post!

SharePoint 2010 Modal Dialog Tips & Tricks

October 30th, 2012 Comments

Wow, another week to-the-day and it’ll have been two years since I posted anything here!

Have learnt much and doing very cool things at Collabware and our CLM product for the past year and I’ve finally gotten off my butt and wrote a post with some tips & tricks on SharePoint 2010 Modal Dialogs on our blog:
http://blog.collabware.com/2012/10/30/tips-tricks-sharepoint-2010-modal-dialogs/

Of note is the ability to resize a modal dialog. I hadn’t found a completely working example so I’ve posted a version of the code we use for Collabware CLM. It leverages the same code that’s in SP.UI.Dialog.js when it initially sizes the dialog on page load. No dependencies on jQuery or other external frameworks!

Issue with custom styles in the SharePoint 2010 Rich Text Editor and @media

October 12th, 2010 Comments

I recenty ran into some issues with exposing custom styles in the SharePoint 2010 Rich Text Editor (RTE) in browsers other than IE, or specifically with Firefox and Safari.

In order to have a custom style show up in either the Markup Styles and Styles drop downs in the Ribbon, you need to prefix your HTML class with either ms-rteElement- (shows up in Markup Styles) or ms-rteStyle- (shows up in Styles). You also need to use the -ms-name property within your rule.

For example:

H2.ms-rteElement-H2Lg {
  -ms-name: "Large Heading 2";
  font-size: 26px;
}

The problem I ran into was that the custom styles showed up the dropdowns for IE but not in any other browser. At first I though it was because the -ms-name property is a custom CSS extension in the MS name space. I tried adding properties like -moz-name and -webkit-name and even name but they had no effect.

Turns out the RTE custom styles don’t show up if they appear inside an @media block in your CSS file!

I ended up creating a bunch of stubs with just name -ms-name property BEFORE the @media block. If you try to place the stubs after the @media block, the RTE does not pick-up the label for the custom styles, they show up as empty options without labels in the RTE drop downs.

/* create stubs with -ms-name property here */
h2.ms-rteElement-H2Lg {
  -ms-name: "Large Heading 2";
}

ul.ms-rteStyle-LinksList {
  -ms-name:"Links List";
}

/* place actual properties inside @media block */
@media screen {

  h2.ms-rteElement-H2Lg {
    font-size: 26px;
  }

  ul.ms-rteStyle-LinksList {
    list-style: none;
    margin: 0;
    padding: 0;
  }

}

You can read more about how to create custom styles for the SharePoint 2010 RTE here:

SharePoint 2010: Fixing the MSDN Contextual Tab Web Part Walkthrough

July 31st, 2010 4 comments

UPDATE!!!

The latest versions of the CKSDev for SharePoint 2010 include an SPI for stubbing out a contextual web part! I highly recommend that anyone coding for SP2010 to install the CKS Dev Tools!

http://cksdev.codeplex.com/

I haven’t had much opportunity to work with SharePoint 2010 in the past few months. However, I did get to try out the MSDN walkthrough for creating a custom web part with contextual ribbon tab recently. You can find the article here: http://msdn.microsoft.com/en-us/library/ff407578.aspx

In a nutshell, what’s supposed to happen is when you click on the web part, there will be a custom tab that appears in the Ribbon. It all works great for the first instance of the custom web part you place onto a page, but if you try adding a second instance of the web part, your page blows up!

You’ll get the following error:
Item has already been added. Key in dictionary: ‘Ribbon.CustomContextualTabGroup’ Key being added: ‘Ribbon.CustomContextualTabGroup’

:-/ … looks like there wasn’t much QA done for the walkthrough. Anyways, to make a short story shorter… I posted a question on the TechNet forums and Dallas Tester from MS did get back to me with a bunch of suggestions.

Here are the changes you can make to allow for multiple instances of the custom web part to appear on the page without everything blowing up.

Make the following modifications to the ContextualTabWebPart class.

Add the global ‘_added’ bool and OnInit event handler:

static bool _added = false;

protected override void OnInit(EventArgs e)
{
 base.OnInit(e);
 _added = false;
}

Since we no longer have to get the unique component ID in the delay script, I changed DelayScript into a private string:

private string delayScript = @"
 function _addCustomPageComponent()
 {
  for (var i = 0; i < g_customWebPartIds.length; i++)
  {
    SP.Ribbon.PageManager.get_instance().addPageComponent(new ContextualTabWebPart.CustomPageComponent(g_customWebPartIds[i]));
  }
 }

 function _registerCustomPageComponent()
 {
  SP.SOD.registerSod(""CustomContextualTabPageComponent.js"", ""/_layouts/CustomContextualTabPageComponent.js"");
  var isDefined = ""undefined"";
  try
  {
   isDefined = typeof(ContextualTabWebPart.CustomPageComponent);
  }
  catch(e)
  {
  }
  EnsureScript(""CustomContextualTabPageComponent.js"",isDefined, _addCustomPageComponent);
 }
 SP.SOD.executeOrDelayUntilScriptLoaded(_registerCustomPageComponent, ""sp.ribbon.js"");";

Modify the OnPreRender event handler:

protected override void OnPreRender(EventArgs e)
{
 base.OnPreRender(e);

 ClientScriptManager csm = this.Page.ClientScript;
 string componentId = SPRibbon.GetWebPartPageComponentId(this); // the unique component id 

 // if this is the first instance of the custom web part,
 //we need to add the contextual tab to the ribbon
 if (!_added)
 {
  this.AddContextualTab();
  _added = true;
 }

 // we need to create an array which will store the IDs of all instances of our custom web part
 csm.RegisterClientScriptBlock(
  this.GetType(), "DeclareCustomWebPartArray", "var g_customWebPartIds = new Array();", true);

 // add this webpart's ID to our array
 csm.RegisterClientScriptBlock(
  this.GetType(), "AddCustomWebPartId" + componentId, "g_customWebPartIds.push('" + componentId + "');", true);
   
 csm.RegisterClientScriptBlock(this.GetType(), "ContextualTabWebPart", this.delayScript, true);
}

If you want to verify that the correct web part is trigger the Ribbon commands, you can modify the ‘handleCommand‘ method in ‘CustomContextualTabPageComponent.js

handleCommand: function ContextualTabWebPart_CustomPageComponent$handleCommand(commandId, properties, sequence) {
 if (commandId === 'CustomContextualTab.HelloWorldCommand') {
  alert(this._webPartPageComponentId + ' says: Hello, world!');
 }
 if (commandId === 'CustomContextualTab.GoodbyeWorldCommand') {
  alert(this._webPartPageComponentId + ' says: Good-bye, world!');
 }
}

Here’s a ZIP file of the entire solution in case you’re too lazy to make the modifications yourself. :-)

SharePoint 2010: CssRegistration ConditionalExpression Property

March 1st, 2010 Comments

In a previous post detailing the new SharePoint 2010 CssRegistration control, I mentioned that I did not know what the ConditionalExpression property did. Well, now I do!

This property takes an Internet Explorer Conditional Comment. For example, if we wanted to link to a style sheet specific to IE 7 or greater, we can do this:

<SharePoint:CSSRegistration Name="foo.css" ConditionalExpression="gte IE 7" runat="server" />

The following markup would be emitted:

<!--[if gte IE 7]>
<link rel="stylesheet" type="text/css" href="foo.css"/>
<![endif]-->

Branding SharePoint 2010 Collaboration Sites – Part 3 in a Series

February 23rd, 2010 4 comments

In part two, we posted about how to register our custom style sheets in a way that we could still take advantage of the new SharePoint 2010 colour switching theming engine. In this post we’ll go through how to do this without having to modify the out-of-the-box master pages or having to use custom master pages for your sites.

Delegate Controls

As I mentioned at the end of part two, the way we’re going to get our CSS added to our sites and pages is through the use of a delegate control. For those of you who aren’t familiar with delegate controls, they are essentially placeholders for you to inject your own controls via a feature. Your feature can be scoped to either Web, Site, WebApplication or Farm. I’m going to keep the explanation on delegate controls short as there’s plenty of information out there about them:

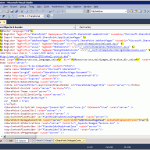
Screenshot of AdditionalPageHead delegate control in v4.master

AdditionalPageHead Delegate Control

The AdditionalPageHead Delegate

Delegate controls have a AllowMultipleControls property which when set to true, all controls keyed to that delegate are added to the page; when set to false, only the control registered with the lowest sequence value is added to the page.

All of the delegate controls in the OOTB master pages have AllowMultipleControls set to false, with the exception of one, AdditionalPageHead, which does allow multiple controls. And guess what? AdditionalPageHead is actually located in the page head, where you would normally add CSS elements! This is the perfect place for us to inject any CSS registration controls.

Putting it all together…

Let’s put together a simple solution using the Visual Studio 2010 SharePoint Tools which will:

  1. deploy our CSS file in the Themable folder in the /Layouts/1033/Styles
  2. deploy a user control into the ControlTemplates folder which uses the CSSRegistration control to register our CSS
  3. install a feature which inserts our user control onto our pages via the AdditionalPageHead delegate

The CSS

Keeping it simple, all our CSS does is set the background color of the <body>. We’ll use #FFF (white) as our default background color and also decorate the rule with one of the SharePoint 2010 compile time directives to whatever we might set the “Light1” color value as through the Theme UI.

body {
/*[ReplaceColor(themeColor:"Light1")]*/
background-color: #fff;
}

The Delegate Control

Again, nice and simple, we’re going to use the CSSRegistration control to register our branding CSS after corev4.css:

<%@ Assembly Name="$SharePoint.Project.AssemblyFullName$" %>
<%@ Register Tagprefix="SharePoint" Namespace="Microsoft.SharePoint.WebControls" Assembly="Microsoft.SharePoint, Version=14.0.0.0, Culture=neutral, PublicKeyToken=71e9bce111e9429c" %>

<sharepoint :CSSRegistration Name="<% $SPUrl:~sitecollection/_layouts/1033/Styles/Themable/SingChan.SP2010.Branding/branding.css %>" After="corev4.css" runat="server" />
</sharepoint>

Element Manifest

And finally we’ll define our element manifest for our delegate feature:

<?xml version="1.0" encoding="utf-8"?>
<elements xmlns="http://schemas.microsoft.com/sharepoint/">
    <control Id="AdditionalPageHead" Sequence="80" ControlSrc="~/_ControlTemplates/SingChan.SP2010.Branding/CSSRegistrationControl.ascx" />
</elements>

You’ll most likely scope your delegate feature to either Web or Site for branding purposes. I tend to scope my feature at the site collection level to achieve a consistent brand across all the webs in the site collection. If there’s a requirement to have different branding for one or two specific sites, then we can always have a second feature which deploys those overrides at a web-level scope. If you have vastly different brands across webs in your site collection, then you may want to scope only at the web level so that your brands don’t conflict or end up with any style inheritance issues.

That’s it!

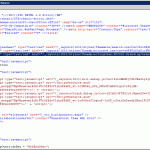
If all went well, we should see the link to our style sheet emitted after the link to corev4.css!

Screen shot of HTML source of page containing a link to the branding CSS.

Our branding CSS being emitted in HTML

If all is not well, here’s the ZIP file containing the branding VS2010 solution for reference:
SingChan.SP2010.Branding.zip

Previously…

Yaroslav on Customizing the SharePoint 2010 Ribbon

December 29th, 2009 Comments

My buddy Yaroslav’s been blogging away about customizing the SharePoint 2010 ribbon, like the mad scientist that he is, over the past few weeks…

Here’s what he’s got so far:

Go check it out!

Categories: Development, SharePoint

Branding SharePoint 2010 Collaboration Sites – Part 2 in a Series

December 29th, 2009 8 comments

In part one of this series on branding SharePoint 2010 collaboration sites I posted a bit about how the new Theming engine works in SharePoint 2010. In this post, we’ll be going over the new and improved CSSRegistration control in SharePoint 2010.

A history lesson; the CSSRegistration control in SharePoint 2007

The CSSRegistration control in SharePoint 2007 basically has one property you can set, the Name is the Url to the CSS file that you want to register. When you register a style sheet through the control, it adds the CSS file to an alphabetically sorted list. The style sheets in this list are then emitted as HTML <link> elements by the CSSLink control.

If you required one CSS file to be emitted before another, you would need to name them accordingly. For example:

<SharePoint:CSSRegistration Name="foo.css" runat="server" />
<SharePoint:CSSRegistration Name="bar.css" runat="server" />

Even though I registered foo.css before bar.css, the HTML on the rendered page would look like so:

<link rel="stylesheet" type="text/css" href="bar.css"/>
<link rel="stylesheet" type="text/css" href="foo.css"/>
<link rel="stylesheet" type="text/css" href="/_layouts/1033/styles/core.css?rev=..."/>

bar.css would come before foo.css and what’s this core.css doing here? Somehow, someone at MS decided that the core.css containing ALL of the base CSS rules for WSS should override any custom CSS!

As a workaround, you could set the DefaultUrl property for the CSSLink control to point to a single CSS file that would come after core.css, and then use @import to link to any additional custom CSS files.

The fact that core.css was emitted after any style sheets registered using CSSRegistration made the CSSRegistration control all but useless in 2007.

The shiny new CSSRegistration control in SharePoint 2010

So things are much better in the SharePoint 2010 world. If you examine the documentation for the SharePoint 2010 version of the CSSRegistration control, you’ll find the addition of the following properties, which currently have no descriptions to their usage in the SDK:

RevealToNonIE (boolean)

I assume this property would allow you to register IE-only style sheets.  This doesn’t seem to be working in Beta 2 though as it doesn’t matter whether I set this to true or false, the CSS files would get emitted regardless of the browser I was using.

ConditionalExpression (string)

Another assumption that this would allow us to set certain conditions in order for the style sheet to appear in HTML. Nothing at all in the way of documentation nor could I find any examples in the 14 Hive as of Beta 2.

This property is an Internet Explorer Conditional Comment. For example, if we wanted to link to a style sheet specific to IE 7 or greater, we can do this:

<SharePoint:CSSRegistration Name="foo.css" ConditionalExpression="gte IE 7" runat="server" />

The following markup would be emitted:

<!--[if gte IE 7]>
<link rel="stylesheet" type="text/css" href="foo.css"/>
<![endif]-->

After (string)

This property is what was sorely missing in 2007. We can now tell the CSSLink control to emit the registered style sheet after another CSS file. You can either define just the leaf filename, ie bar.css or the path to the CSS file, ie /foo/bar.css. If you don’t use the After property, style sheets will still be emitted by alphabetical order. For example:

<SharePoint:CSSRegistration Name="bar.css" After="foo.css" runat="server" />
<SharePoint:CSSRegistration Name="foo.css" runat="server" />

bar.css is emitted after foo.css because we specified the After property when we registered bar.css:

<link rel="stylesheet" type="text/css" href="foo.css"/>
<link rel="stylesheet" type="text/css" href="bar.css"/>
<link rel="stylesheet" type="text/css" href="/_layouts/1033/styles/Themable/corev4.css?rev=..."/>

corev4.css IS STILL emitted after everything else for whatever reason, unless you use the After=”corev4.css” property when registering AND there are a few gotchas that you need to be aware of.

Gotcha 1: You’re never sure of the sort order

As of Beta 2, there’s some weirdness when you register multiple style sheets that all require to be after the same CSS file. They are no longer sorted alphabetically but in most cases they end up being last in first out:

<SharePoint:CSSRegistration Name="1.css" After="corev4.css" runat="server" />
<SharePoint:CSSRegistration Name="2.css" After="corev4.css" runat="server" />
<SharePoint:CSSRegistration Name="3.css" After="corev4.css" runat="server" />

I was expecting 1, 2, 3… but instead I get 3, 2, 1…

<link rel="stylesheet" type="text/css" href="/_layouts/1033/styles/Themable/corev4.css?rev=..."/>
<link rel="stylesheet" type="text/css" href="3.css"/>
<link rel="stylesheet" type="text/css" href="2.css"/>
<link rel="stylesheet" type="text/css" href="1.css"/>
Gotcha 2: I need something AFTER another thing…

The other thing to take note on is when you need to define nested After. For example, I need to make sure that the style sheets are emitted in the order 1, 2, 3, 4:

<SharePoint:CSSRegistration Name="1.css" runat="server" />
<SharePoint:CSSRegistration Name="2.css" After="1.css" runat=”server" />
<SharePoint:CSSRegistration Name="3.css" After="2.css" runat="server" />
<SharePoint:CSSRegistration Name="4.css" After="3.css" runat="server" />

We don’t get what we would expect the result to be, instead it comes out as 1, 4, 3, 2:

<link rel="stylesheet" type="text/css" href="1.css"/>
<link rel="stylesheet" type="text/css" href="4.css"/>
<link rel="stylesheet" type="text/css" href="3.css"/>
<link rel="stylesheet" type="text/css" href="2.css"/>

It looks like as a general rule of thumb, you should register the style sheet which comes after another one FIRST. So in order to get 1, 2, 3, 4 we need to define our registration like so:

<SharePoint:CSSRegistration Name="4.css" After="3.css" runat="server" />
<SharePoint:CSSRegistration Name="3.css" After="2.css" runat="server" />
<SharePoint:CSSRegistration Name="2.css" After="1.css" runat="server" />
<SharePoint:CSSRegistration Name="1.css" runat="server" />

EnableCssTheming (boolean)

Remember those “Themable folders” and compile time directives in the CSS files I mentioned about in Part 1? The EnableCssTheming property tells the SharePoint 2010 theming engine to recompile the style sheet using any directives found within the registered CSS file if the file’s location is in one of those “Themable” folders. EnableCssTheming is “true” by default, you have to explicitly set it to “false” if you do not want the registered style sheet to be parsed and re-compiled.

For example:

<SharePoint:CSSRegistration Name="<% $SPUrl:~sitecollection/_layouts/1033/Styles/Themable/foo.css %>" runat="server" />

If we don’t have a theme selected, the HTML emitted will be:

<link rel="stylesheet" type="text/css" href="/_layouts/1033/Styles/Themable/foo.css"/>

But if there’s a theme applied to a site, it will be in one of two locations, where [1234567] and [12345678] are hex values that represent the theme name and CSS file paths. The ctag QueryString parameter is a simple integer counter used for cache invalidation. It increments up every time a web’s theme gets changed.

If the theme was applied through the web UI:

<link rel="stylesheet" type="text/css" href="/[WEB PATH]/_themes/[COUNTER]/foo-[12345678].css?ctag=[COUNTER]"/>

Or, if the theme was set programmatically using the ThmxTheme class and shareGenerate was defined as “true” it will be located here:

<link rel="stylesheet" type="text/css" href="/_catalogs/theme/Themed/[1234567]/foo-[12345678].css?ctag=[COUNTER]"/>

Just to re-iterate, the two three locations where the “Themable” folder can be located are:

  1. In the “14 hive” at %ProgramFiles%\Common Files\Microsoft Shared\Web Server Extensions\14\TEMPLATE\LAYOUTS\[LCID]\STYLES\Themable;

    Where [LCID] is the Locale ID. In North America, the default is “1033” for English (US).

  2. In each web’s Style Library/Themable. These CSS files only affect the specific web and all languages.
  3. In each web’s Style Library/[LANG]/Themable.

    These CSS files only affect the specific web and a specific language. In North America, the default is “en-US

You can place your CSS files inside sub-folders of Themable for neatness but not the other way around… /Style Library/Themable/foo/bar.css will be recompiled by SharePoint 2010’s theming engine while /Style Library/foo/Themable/bar.css will not.

In the next episode…

Whew! We’ve now gone through how to register a style sheet so that it’s compatible with the new SharePoint 2010 theming engine.

My next post will be how to get our custom style sheets onto the out-of-the-box collaboration sites without having to create custom site templates or master pages. We’ll revisit an old friend (or new acquaintance to some), the Delegate Control!

UPDATE:

Branding SharePoint 2010 Collaboration Sites: Part 1 in a Series

December 23rd, 2009 2 comments

Themes are dead! Long live themes!

The “awkward” themes system based on CSS and images in SharePoint 2007 is going the way of the dodo. No more deploying into the “12 hive” and having to modify the SPThemes.XML to register your theme.

As you may already know, in SharePoint 2010, themes are now just a set of colour and font values specified in an Office .thmx file. You upload a .thmx file into the Themes catalog and a site administrator can “theme” their site using the updated Themes web interface.

Unfortunately, if you want to brand any of the out-of-the-box SharePoint 2010 collaboration sites beyond colours and a couple of font choices, you will need to jump through a few hoops. All of which I’ll try to explain to you in this series of blog posts.

How does the SharePoint 2010 Theming Engine work?

So what happens behind the scenes when you select a 2010 theme to apply to your site? How do the new colours specified in the .thmx file and/or the colours you’ve chosen through the web interface get applied to your site?

There  are essentially two main locations where CSS files for SharePoint 2010 are stored:

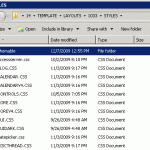
Themable folder in 14 Hive

Themable folder in 14 Hive

  1. In the “14 hive” at %ProgramFiles%\Common Files\Microsoft Shared\Web Server Extensions\14\TEMPLATE\LAYOUTS\1033\STYLES;

    The exact location of the CSS files varies depending on whether you have a language pack installed and have another language as the default. I’m in North America and the Locale ID for the majority of our projects is 1033 for English (US).

    These CSS files are used by all webs located on the front-end web server.

  2. In each web’s Style Library. These CSS files only affect the specific web.
Themable folder in web's Style Library

Themable folder in web's Style Library

Oh, btw, when I say “web,” I mean SPWeb… if you’re a SP Dev, you’ll know what I’m talking about, otherwise think “site” but not “SPSite”…

So you must be thinking, “that’s exactly the same as in SharePoint 2007!” And you would be right, but if you look in the first location, you’ll notice a folder named “Themable”…

If you look in the Style Library of a team site, you won’t find anything… :-) BUT if you were to create a Publishing Portal and look inside the Style Library, you’ll find a “Themable” folder as well…

Taking a look at some of the CSS files, you’ll notice some things in the CSS comments like:

/*[ReplaceColor(themeColor:"Light1")]*/
background-color: #fff;

/*[RecolorImage(themeColor:"Accent6",method:"Tinting")]*/
background-image:url("/_layouts/images/selectednav.gif");

What this? Compile time directives?

Yup, when the user selects a theme for a web, SharePoint goes and recompiles the CSS and places the compiled CSS files into the web’s “_theme” folder.

UPDATE: There’s also a second location in the content DB where a compiled theme could live besides a web’s “_theme”. If you use the ThmxTheme.SetThemeUrlForWeb method to set the web’s theme and specify “true” for the shareGenerated parameter, the compiled CSS files will be located in “/_catalogs/theme/Themed/[1234567]” instead. [1234567] is some hex value based on the theme name or folder, not exactly sure ATM.

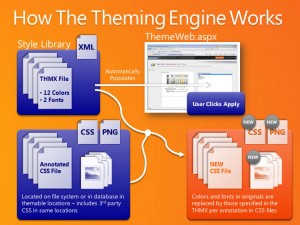
SharePoint will replace any colors defined in the rule following the comment with the matching colour that’s defined in the .thmx or the web interface. It can even re-render graphics based on pixel co-ordinates, tinting (as seen in the second example above) or even re-render gradients for you! This is going to be a great time saver for projects where requirement dictates multiple colour variations on a central design!

How the SharePoint 2010 Theming Engine Works

Slide shamelessly stolen from Elisabeth Olsen's presentation at SPC09.

What are all the directives? Dunno. There’s absolutely no documentation that I’ve found at the moment. There’s plenty of examples sprinkled throughout the CSS files found in the “Themable” folders though. I’m hoping someone out there compiles a list of all of them sooner rather than later.

In the next episode…

My next post will be on the new and improved CSSRegistration control which is how we can add our own custom CSS that can also take advantage of the new 2010 theming system!

UPDATE:

SPC09: Status Bar and Notification APIs

November 3rd, 2009 Comments

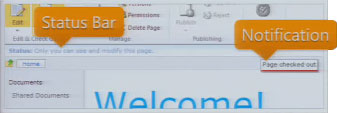
SharePoint 2010 Status Bar and Notification elementsExcuse the really bad screen cap to the right… the Status Bar and Notifications are two UI elements in SharePoint 2010 which allow us to give the user information in context without distracting them. The Status Bar and Notifications are both exposed as client-side JavaScript APIs.

Status Bar

The Status Bar lives below the Ribbon and displays persistent information such as page status or web site alerts. It already existed in SharePoint 2007 as an UI element but it’s functionality was not exposed as an API. It will display an HTML message, which can include links and/or images, on 1 of 4 pre-set background colours depending on the importance of the status defined.

There is a Server API to set statuses at page render time as well as a JavaScript API to dynamically add/remove messages.

The JavaScript API is in the SP.UI.Status namespace and is as follows:

SP.UI.Status.addStatus(strTitle, strHtml, atBeginning)
SP.UI.Status.updateStatus(sid, strHtml)
SP.UI.Status.removeStatus(sid)
SP.UI.Status.removeAllStatus(hide)
SP.UI.Status.setStatusPriColor(sid, strColor)

Notifications

Notifications are brand new to SharePoint 2010 and they are used for transient or semi-transient messages such as action confirmations. Notifications appear on the right side of the page below the ribbon and default to a 5 second display period. Like the Status Bar, the message format is HTML with the ability of including links and/or images.

There is a JavaScript API to add/remove messages. You also have the option to make a Notification “sticky” which means it will continue to display until you manually remove it through the API.

Notifications are in the SP.UI.Notify namespace:

SP.UI.Notify.addNotification(strTitle, bSticky, tooltip, onclickHandler)
SP.UI.Notify.removeNotification(id)